Skip to Main Content
Ask A Librarian

Information Literacy Online Instruction Resources

Resources for librarians teaching online: one-shots / information literacy instruction

Zoom is a real-time web conferencing application much like GoToMeeting or Skype. It’s a cloudbased system that allows you to host online meetings, screen-share, group messaging and the ability to record it all and share with your students. Their solution is easy to use and offers great video and audio quality across multiple platforms.


Host and Co-host

As the host in a meeting, you can manage the participants. By default, any participant in a meeting can share their video, screen, and audio. To allow someone, such as a moderator, co-hosting duties, you will have to enable

The co-host feature allows the host to share hosting privileges with another user, allowing the co-host to manage the administrative side of the meeting, such as managing participants or starting/stopping the recording. The host must assign a co-host. There is no limitation on the number of co-hosts you can have in a meeting or webinar.


Assigning a Co-host:

Use any one of these options.

  • On your co-host's participant window click on and choose Make Co-Host.
  • Open the Participants panel. Hover over your co-host's name and select, More and choose Make Co-Host.
  • When scheduling your workshop, assign your co-host as the alternative host. Alternative hosts shares the same controls as co-hosts but can also start the meeting.

Controls for hosts and co-hosts

  • Start polling
  • Mute or unmute participants
  • Remove attendees
  • Share screen

Controls only available to hosts:

  • Assign participants to breakout rooms. The co-host can leave and join any breakout room only if they join a breakout room assigned to them by the host.
  • End meeting


Breakout Rooms

Breakout rooms allow you to split your Zoom meeting into separate sessions. The meeting host can choose to split the participants of the meeting into these separate sessions automatically or manually, or they can allow participants to select and enter breakout sessions as they please. The host can switch between sessions at any time.

To use Breakout rooms during your session, first make sure the you have enabled the setting. To do this, log into Zoom and go to Settings > In Meeting (Advanced) > Breakout room. The button to the right should be blue.

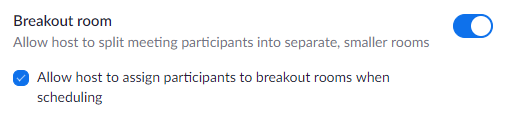
Please note: only the host can assign participants to breakout rooms. The co-host can leave and join any breakout room only if they join a breakout room assigned to them by the host. The host can choose to allow participants to choose their own room, but this must be done in the meeting by the host.


Creating breakout rooms during a session

  1. When you are ready to start, click on Breakout Rooms
  2. Select the number of rooms you would like to create, and how you would like to assign your participants to those rooms:
    • Automatically: Let Zoom split your participants up evenly into each of the rooms.
    • Manually: Choose which participants you would like in each room.
    • Let participants choose room: Participants can select and enter rooms on their own.
  3. Click Create Breakout Rooms.

Things to consider:

  • Assign a clear task for students to accomplish, such as brainstorming, coming to a position on a set of questions, etc.
  • When using Breakout Rooms encourage students to use audio and video where possible.
  • Match the amount of time and number of students to the task.
  • Have students take notes collaboratively. Tools such as Padlet and Google docs are helpful for this.
  • Make sure there are enough host/co-hosts to monitor the rooms.
  • Share instructions for the breakout activity where students can see them
  • Assign roles to students.
  • Let students know how to ask for help after they join their breakout rooms.
  • Teach students how to share their screens and use the whiteboard feature.
  • Moderators can help participants who are having technical issues
  • Breakups monotony of lectures
  • Breakout rooms are smaller than the full group and can be more personable for students. This can lead to more participation.


Whiteboard

The use of a virtual whiteboard in Zoom asynchronous sessions can be used like a physical whiteboard used in traditional classrooms. Students can be prompted with questions and can add to the whiteboard when you are sharing your screen.


Sharing the Whiteboard

  1. Click the Share Screen button located in your meeting tool bar.
  2. Click Whiteboard.
  3. Click Share.
  4. You can use the page controls in the bottom-right corner of the whiteboard to create new pages and switch between pages.

Attendee Participation with Whiteboard

  • Participants will need to have their annotations tools open to participate with the Whiteboard. When screen sharing is on, can open these tools by clicking on View Options < Annotate at the top of their screen.
  • Note: you do have to have annotation tools enabled for this to be an option. To check that you have this available, log in to Zoom and go to Settings > In Meetings (Basic) > Annotation. If the button is blue then it is available.

Things to Consider:

  • Give students open-ended prompts and ask them to respond on the whiteboard.
  • Draw separate sections in the whiteboard and ask students to discuss different aspects of a topic, potentially to assess prior knowledge of a new topic or to affirm their learning after teaching a topic . Students type in their response in the appropriate section of the board.
  • Ask students to enter their reflections after a specific activity. You can use prompts like “What were your opinions?”, “What are your suggestions?”, etc.
  • Have students a star or checkmark if they agree or an “x” if they disagree.
  • Create a concept map and let students fill it in.
  • Break out room activity and discussions.


Polling

The polling feature for meetings allows you to create single choice or multiple choice polling questions for your meetings. You will be able to launch the poll during your meeting and gather the responses from your attendees. You also have the ability to download a report of polling after the meeting.

To use Polling during your session, first make sure the you have enabled the setting. To do this, log into Zoom and go to Settings > In Meeting (Basic) > Polling. The button to the right should be blue.


Creating Polls

  1. Go to the Meetings page and click on your scheduled meeting.
  2. From the meeting management page, scroll to the bottom to find the Poll option. Click Add to begin creating the poll.
  3. Create a poll question with a title.
  4. Select whether you want the question to be single choice (participants can only choose one answer) or multiple choice question (participants can choose multiple answers).
  5. Type in the answers to your question and click Save at the bottom.
  6. To add more questions click Add a Question.

Using Polls in Your Session

  1. During your session, click on Polls in the meeting controls.
  2. Select the poll you would like to launch and click Launch Poll.
  3. The participants in the meeting will now be prompted to answer the polling questions. You will be able to see the results live.
  4. Once you would like to stop the poll, click End Poll.

Downloading Results of your Polls

  1. Sign in to the Zoom.
  2. Select Reports.
  3. Select Meeting.
  4. Select Poll Report.
  5. Select a time range during which your session occurred.
  6. Click Generate in the last column.

Things to consider

  • Use as an ice breaker to begin a session.
  • Check background knowledge participant have on a topic or session learning objective.
  • Get feedback based and participant reflection on learning objectives.
  • Ask questions that gain insight into students’ understanding of a certain topic.


Student Feedback Tools

Encourage student interaction with Zoom annotations, reactions, and participation via the chat window.


Nonverbal and Reactions Feedback

Nonverbal feedback needs to be enabled in Zoom. To do this log into Zoom and go to the Meeting tab > In-Meeting (Basic) Nonverbal Feedback. If the button is blue it is enabled.

Students are able to access these options from the Participants panel.


Annotation Tools

Participants will need to have their annotations tools open to participate with the Whiteboard. When screen sharing is on, can open these tools by clicking on View Options < Annotate at the top of their screen.

Note: you do have to have annotation tools enabled for this to be an option. To check that you have this available, log in to Zoom and go to Settings > In Meetings (Basic) > Annotation. If the button is blue then it is available.